Propel is a new NumPy-like scientific computing and machine learning library for JavaScript, currently under heavy development on GitHub. It’s main contributors are Ryan Dahl and Bert Belder (early contributors to the Node.js project).
Machine learning can be very computationally intensive, involving manipulating large matrices of sometimes enormous amounts of data. Currently TensorFlow is a popular library for handling this, and is able to use GPUs to help process it’s tasks and improve performance.
TensorFlow’s great and it’s well-documented but let’s be honest, it’s a bit weird. Just getting started requires thinking about the flow of your program in a whole new way, which may be distracting if you’re also a machine learning noob like myself. Although it’s still quite early days, Propel offers a relatively easy to understand interface and makes use of TensorFlow under the hood for performance.
Here we’ll run through the example provided with Propel (which trains a model), and then extend it a little to make inferences based on our trained model.
Getting set up
Propel is exciting but not exactly production ready yet. I found the best way to install it is to clone the repo as the npm package seems to have more bugs. However for this example, either method should work.
Installing from GitHub
First, recursively clone the repo (this must be recursive as the project’s dependencies are included as submodules):
Build the TensorFlow bindings (you must have clang installed — on Ubuntu this was just # apt install clang):
and then compile the project from TypeScript:
In order to run the provided example, you’ll need to tweak it a little. Just change the first line from:
to:
Installing with npm
Alternatively if you’d prefer to try out the npm package:
And then for improved performance (using TensorFlow bindings), install one of these depending on your system:
Then save the example.js file from the Propel repo into your project’s root directory.
Bear in mind that the project really is under heavy development — it changed many times as I wrote this post!
Training a model with the provided example
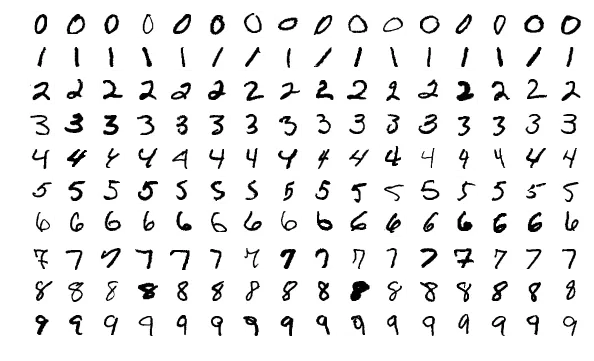
The example neural network provided in the project’s root directory trains a model for the MNIST data set of handwritten digits. This data set is a collection of images (preprocessed to be centred 28 x 28 pixel images with similarly sized digits), along with their labels — the actual digits each image contains.

The data is split into two parts — the training data, which we will use to find the parameters for our model, and testing data, which we can run through our model to check that it works (if we tested the model on the same data we trained it on we wouldn’t know if it was really learning).
When you run $ node example.js 3000 (3000 is the number of iterations the model will train over) you should see output like the following (if you installed from GitHub — the output looks a bit different from the npm package):
Great! You have your model. What now?
Applying the model
After training your model, you probably want to see it in action. For this, we first need to load our most recent saved checkpoint into a params object, and then run our image(s) through our model with these parameters. I wrote a bit of code to do this using the MNIST test data, see gist.
What just happened?
The model used is an example of a neural network. Our first step was to train our model: starting with random parameters, we fed training data (images labelled with the correct classification) through the model’s layers, calculated how inaccurate a result these parameters provided and used this information to improve them (this adjustment process is called optimisation). Rinse and repeat until our results are good enough (the example stops after 3000 iterations — you can increase this for better accuracy).
Then, using our much-improved parameters, we ran some new images through our model (the test data). These images are also labelled, but we don't pass the labels through the model this time — instead we compare them to our model’s predictions to evaluate it’s accuracy.
In order to calculate the accuracy we compare, for each image, the model’s predicted digit to the label provided with the image. The output from the model for each image is actually a group of ten probabilities — the probability that the image represents each digit 0–9, e.g. for the first image in the test data:
This tells us that the model predicts that this image represents the digit 7 (as the highest probability is at the 7th position), which in this case matches the corresponding label.
What’s it going to be?
The idea seems to be to be able to train models server-side (using TensorFlow's C bindings for performance) and then apply these models and visualise results client-side taking advantage of WebGL (using deeplearn.js and Vega), all with one easy to use API (training in the browser is also available although this is slower so not always practical).
Why not use Python/TensorFlow/…?
Because we like JavaScript :)
From the Propel homepage: ‘JavaScript is a fast, dynamic language which, we think, could act as an ideal workflow for scientific programmers of all sorts.’ Also, if your project is already a Node.js/JavaScript project, you’ll be able to seamlessly incorporate performant machine learning/scientific computing without having to introduce a whole new ecosystem.
So although it may not quite be ready yet, have a play around with it and keep an eye on how it progresses. Ryan Dahl is also due to give a talk on the project at JSConfEU 2018.
Notes
- If running the build script gives you an error about Chromium, ignore the advice provided with the error and instead run
$ npm rebuild puppeteerand then try the build file again. - GPU acceleration is currently only possible on Nvidia graphics cards, as only CUDA is supported (by Tensorflow and so also by Propel).
- TensorFlow.js was recently released and although it’s currently browser-only they’re working on Node.js bindings to the TensorFlow C API which will make it a contender with Propel.
Machine Learning Resources
- Machine Learning Guide podcast — high level fundamentals of machine learning which you can listen to on your commute.
- Andrew Ng’s Machine Learning course on Coursera — more detail about machine learning algorithms and how to apply them.
- Neural Networks and Deep Learning — free e-book with more in-depth technical detail.


